Saturday, May 7, 2016

Charles' Law

Charles' Law says that temperature and volume vary directly. This is true at constant pressure only. The temperature for all problems using this law must be in Kelvin. The conversion for this is: C + 273.15 = K. As temperature increases, the gas gains energy. This makes it contact with the side of the container more and want to expand. The formula we use for these problems is:


Example: Gas at 15C and 1 atm has a volume of 2.58L. What volume will it have at 38C and 1 atm?

T1=15+273.15=288.15K   V1=2.58L   T2=38+273.15=311.15K   V2=?

(2.58)(311.15)/(288.15) = 2.79L

Here are a few more practice problems like the one above!

Wednesday, May 4, 2016

Boyle's Law

Boyle's Law says that the relationship between pressure and volume is inverse. It deals with only two of the four variables that determine the state of a gas. The only gas that actually holds to this relationship is an ideal gas at low pressure. The equation used for this law is:


Example: Pressure on the peak of Mt. Everest is 150mmHg. If climbers carry 10.0 L tanks with a pressure of 3.04x10^4 mmHg, what will be the volume of the oxygen when it's released?

V1=10.0L   V2=?   P1=3.04x10^4mmHg   P2=150mmHg

10(3.04x10^4) = V2(150)   =   2.0x10^3 L

Here are some more practice problems for these

Monday, May 2, 2016

Combined Gas Law

The Combined Gas Law is used to deal with changes in all of the variables: moles, temperature, pressure, and volume. The formula we use to calculate this is:


Example: A bubble rises from the bottom of a lake when temperature and pressure are 8C and 6.4 atm. The bubble reaches the surface where it is 25C and 1atm. What's the final volume of the bubble if the initial was 2.1mL?

P1=6.4atm   V1=2.1mL   T1=8+273.15=281.15C    P2=1.00atm   V2=?   T2=25+273.15=298.15C

6.4(2.1)298.15=1(V2)281.15   =    14mL

Here are more practice problems

Saturday, April 30, 2016

Avagadro's Law

Avagadro's Law says that for a gas at constant temperature and pressure, the volume is directly proportional to the number of moles of gas. Equal volumes of gases at the same temp and pressure have the same amount of particles. This relationship is even true for gases at low pressures. The relationship for this law is:


Example: We have 12.2 L containing .50 moles of oxygen at a pressure of 1 atm and a temp of 25C. If all of the oxygen is converted to ozone at the same temp and pressure, what would be the volume?

3O2-->2O3
V1=12.2L    N1=.50mol    V2=?    N2=.33 mol

.5mol x 2mol/3mol = .33mol
12.2(.33)=V2(.5) = 8.13L


Thursday, April 21, 2016

Calculating Heat

To calculate heat, you use the formula Q=mcAt (A is representing delta)

Q is heat in Joules
m is mass in grams
c is specific heat in J/g degrees C
At is change in temperature

Example 1: Calculate the amount of energy in joules required to heat 454 grams of water from 5.4C to 98.6C:

Q=?   m=454g    At=93.2  Ti=5.4   Tf=98.6   c=4.184
454(4.184)(98.6-5.4)= 1.77x10^5 J OR 177 kJ

Example 2: A 2.6g sample of metal requires 15.6J of energy to change its temperature from 21C to 24C. What's the identity of the metal?

m=2.6g   Q=15.6J   Ti=21   Tf=34   c=?
15.6=2.6(c)(34-21)
C=.46 J/gC OR Iron

Tuesday, April 19, 2016

Temperature and Heat

The Kinetic Molecular theory states that as a substance is heated, molecules gain energy. However, we cannot measure the amount of energy in the form of heat a substance contains, but we can measure the flow of heat energy. This is always from a warm to cold body until the temperature equalizes. This change is used to measure heat flow.

Exothermic: If there's an output of energy out of the system, then the system is losing energy.

Endothermic: If there's an input of energy into the system, then the system is gaining energy.

Endothermic vs. Exothermic


Monday, April 11, 2016

Music Video Reflection

Exciting news! After submitting Hamming and I's biodiesel music video to the American Lung Association's contest, we were notified that we made it to the top 10, along with 2 other groups from our school! Now, while waiting for the official results to come out, we have the chance to earn $250 by getting the most views on our video. To help us with this, all you have to do is press on the special link below and listen to our little ukulele tune. Thanks!!


Friday, April 8, 2016

Biodiesel Boat Lab

Over the past few days, Hamming and I have been working on engineering, constructing, re-constructing, and finally running our biodiesel boat. We ran into many problems along the way, including multiple leaks, spilled fuel, and semi-toxic fumes coming from our homemade candle. In the end, we got somewhere around fourth place! The only thing that kept us from actually placing was that, the whole way down the track, it went side to side and bumped off the edges. We ended up making the boat out of a cut up soda can, held together by aluminum tape and lots and lots of hot glue. We also accidentally went through 3 engines before the end of it, oops. Overall, this project was super fun and also very educational because it made us creatively problem solve, while also learning about biodiesel. Here are the instructions on how to make your own: Biodiesel Boat


Monday, April 4, 2016

Music Video Project

My lab partner, Hamming Lin, and I made a music video all about biodiesel and its beneficial effects. I think it turned out pretty well. Here is a link to it! Enjoy!

Monday, March 14, 2016

Bond Polarity

For molecules to be polar, it means that there is a difference in electronegativity and that their dipole moments don't cancel each other out. This is caused by one atom exerting more of a force on the electron cloud than the other. An electric dipole is the unequal sharing of electrons within a bond. Partial charges are marked by delta plus and delta minus. This is shown below:


If the only bond in a molecule is polar, the molecule is polar. If the bond is nonpolar, the molecule is nonpolar. If it is nonpolar, there is no difference in electronegativities, the dipole moments cancel, and they have a symmetric shape. In molecules with more than one bond, both the shape and bond polarity determines if it's polar or not. 

Here are a couple links to practice problems for what is explained above:

Sunday, March 13, 2016

Shapes of Molecules

There are five shapes of molecules that we have learned about so far:

Tetrahedral:
Have four bonded entities around a central atom. Its shape and geometry are both tetrahedral. These molecules are not flat, symmetrical, non-polar, and have identical bond angles.

Trigonal Pyramidal:
Have three bonded entities and one lone pair of electrons on the central atom. Its shape is trigonal pyramidal, while its geometry is tetrahedral. These molecules have no symmetry and are polar.

Bent:
Have two bonded entities and two lone pairs of electrons on the central atom. Its shape is bent, while its geometry is tetrahedral.

Linear:
Have two bonded entities and no lone pairs of electrons on the central atom. Its shape and geometry are both linear.

Trigonal Planar:
Have three bonded entities and no lone pairs of electrons on the central atom. Its shape and geometry are both trigonal planar. These molecules are non-polar.

Here is a picture of a few of the shapes listed above, and an example of their Lewis Structure:

Source for above picture

Here is a website that I found that explains these shapes more in-depth, and even has practice games on it: Molecular Shapes


Molecular Model Lab

This past week in chem class, we went to the library (for the first time ever), to do a lab about molecular models. We were given 10 molecules, and using the "have, need, share" method, we had to determine their Lewis Formula. Here is a link to a website that I found that explains how to draw Lewis Structures: Lewis Structures. We also had to sketch their 3-D Geometry, after we built the molecule. This lab really really helped me better understand how to use/do the "have, need, share" method, which I think will be super beneficial when it comes time for the test. Also, I enjoyed this lab because the change of scenery was nice, and it was really fun getting to write on the dry-erase tables. I've never seen anything like that! Here is a picture of what the table looked like with all of our writing on it, and some of the pieces we used to build the models:


Sunday, March 6, 2016

Electronic Structure Test Reflection

After taking the test for this unit on Friday, I am feeling very confident about it. I've never felt this good about a test in Chemistry! It's probably partially due to the fact that this is just an easy unit, but I think it is also because I studied a lot. I did all four online practice tests, printed out all of the other study tools and completed all of them before the quiz and re-did them before the test. I actually did not do very well on the quiz for this unit, so that also kinda freaked me out and made me realize that I needed to study more in order to redeem myself on the test. The only thing on the test that tripped me up a little bit was just one question having to do a math calculation, and I didn't know what formula to use on it. Other than that, I actually knew how to do everything! For the future, I now know that if I want to do well on a test, I need to study as hard as I did for this unit. I'm just hoping that the next unit will be as pain-free as this one was!

Periodic Trends

Here are the four periodic trends that we learned about last week in class:

Atomic Size: As you move down a group and from right to left on the table, the atoms tend to get larger. This is due to electrons being added to larger orbitals and shielding. Here is a picture that helped me better visualize what the sizes of each elements atoms are:

Source of above picture

Ionization Energy: As you move up a group and from left to right on the table, the ionization energy increases. This means that it needs more energy to remove an electron from a gaseous atom. Here is a website that I found to help explain what ionization energy is: Ionization Energy

Electron Affinity: As you move up a group and from left to right on the table, electron affinity increases. This is the ease with which an electron may be added to an atom, forming an anion. Some electron affinities can even be negative.

Electronegativity: As you move up a group and from left to right on the table, electronegativity increases. This is the tendency of an atom to draw electrons toward itself when chemically combined with another element. Here is a website that helped me to understand what this means: Electronegativity

Sunday, February 28, 2016

Quantum Numbers

Every electron has four quantum numbers:

1. Principle Quantum Number: the same number as the principal energy level.

2. Angular Momentum Quantum Number: determined from the sublevel; 0,1,2,3 for s,p,d,f.

3. Magnetic Quantum Number: runs from -1 to 1.

4. Spin Quantum Number: 1/2 for the first electron in an orbital and -1/2 for the second.

Examples:

Assign quantum numbers for each electron:

*4d3 = (4, 2, 0, 1/2)

*2p1 = (2, 1, -1, 1/2)

*1s1 = (1, 0, 0, 1/2)

Determine the electron for each quantum numbers:

*(3, 2, 0, -1/2) = 3d8

*(2, 1, 1, 1/2) = 2p3

*(4, 3, 0, 1/2) = 4f4

Electronic Structure

There are four levels of organization to describe the location of an electron in any atom:

1. Principal energy level: How far away from the nucleus an electron is (n).

2. Sublevel: There are four different sublevels called s, p, d, and f. They are shown here:
Source of above picture

3. Orbitals: The s sublevel has one spherical orbital. The p sublevel has three dumb-bell shaped orbitals. The d and f sublevels have five and seven orbitals, respectively, and are complexly shaped.

4. Spin: Each orbital can hold two electrons of opposite spin, one upward and the other downward.

There are rules for placing electrons:

1. Aufbau Principle: Electrons enter the lower energy orbitals first.
2. Pauli Exclusion Principle: An orbital can only have two opposite spinning electrons.
3. Hund's Rule: In a sublevel, electrons must enter singly and then pair up.

Here is a website that explains these rules more in-depth: Electron Placing Rules

Spectroscopic Analysis Lab

A few days ago, we completed a super easy lab where we did the spectroscopic analysis of Cr3+ and Co2+. We got to use a really cool and high-tech piece of equipment, called a spectrophotometer. I had never used this before, so it took a couple minutes to get myself acquainted with what each of the buttons/knobs did, but once I did that, the lab was a piece of cake. Using the machine, we tested solutions of both of the elements from a wavelength of 375-625 nanometers. Here is a website that I found to explain how a spectrophotometer works: Spectrophotometer

Here is what the machine that we used looked like:

Flame Test Lab

Around a week ago in chemistry class, we started off this new unit by doing a lab where we burned different solutions and determined the wavelengths of those solutions, based off of what color the flame was. Here is the website that I used to accomplish this: Wavelengths

This lab was very simple to carry out, considering all we had to do was burn each of the solutions, which were pre-prepared for us. However, this lab was definitely one of the more interesting ones that we have done. I had no idea that flames could turn hot pink or bright green! We also looked at some of the flames through cobalt glass, which made it even easier to differentiate between the colors of all of them. Overall, this lab was very interesting and also helpful, because the conclusion made us practice calculating energy, given wavelength, which was actually on our quiz that we just took the other day. Here is a website that I found to explain how to do this calculation: Finding Energy

Here is what the flame looked like when we tested LiNO3:

Monday, February 15, 2016

Molar Mass of an Unknown Acid Lab

Last week in chemistry class, we completed our third and final acids and bases lab to determine the molar mass of an unknown acid. In order to be able to do this lab, we had to write our own procedure. First, we added 100mL of NaOH to our buret and then mixed around .5 grams of KHP with water in a flask. After the KHP was dissolved, we added 3 drops of phenolphthalein to act as our indicator. Then we titrated this using the NaOH in the buret, until the solution turned and stayed pink. Then we recorded how much NaOH was used. After this, we repeated these same steps, but with around .2 grams of the unknown acid in our flask, instead of KHP. In order to get the unknown acid to dissolve in the water, we had to heat/stir the solution at the same time. This was a new experience, because we had never used an automatic stirrer before. Overall, this lab was interesting and a good conclusion to the unit using everything that we had learned.

Here is what the solution looked like on the hot plate as we were heating it:


Water as an Acid or Base

The H+ ion in water is just a proton and they form clusters. The simplest cluster is H3O+, and is called a hydronium ion. Larger clusters can also occur, like H5O2+ or H9O4+. Water is amphoteric because it can be an acid or a base, Water can be an acid because it donates protons, it can also act as a base because it accepts protons to form hydronium ions. Pure water auto-ionizes by the following equation:

For more help with understanding the auto-ionization of water, I found this website: Auto-Ionization


Sunday, February 7, 2016

Titrations and Buffers

Titration is a technique that helps determine concentration of an unknown acid or base. The reactions are called neutralization reactions, but don't actually form neutral solutions.

When titrating, the solution in the buret is the titrant and it always has a known concentration.

This solution then is combined with a solution called the analyte, which has an unknown concentration.

To know when the chemical reaction is complete, look for a color change in the analyte due to an indicator that is pH sensitive.

Once the analyte changes color, the endpoint has been reached.

Given all of the volumes and concentrations that we know, we can then calculate the concentration of the unknown.

Percent Acetic Acid in Vinegar Lab

Last week in chemistry class, we completed a three day lab to determine the percent of acetic acid in vinegar. In order to be able to do this lab, we had to memorize the procedure. First, we added 100mL of NaOH to our buret and then mixed around .5 grams of KHP with water in a flask. After the KHP was dissolved, we added 3 drops of phenolphthalein to act as our indicator. Then we titrated this using the NaOH in the buret, until the solution turned and stayed pink. Then we recorded how much NaOH was used. After this, we repeated these same steps, but with vinegar in our flask, instead of all water. This lab was really interesting, and it was a challenge to try and get the solution to turn pink without making it too dark. Here is a website that I found that explains how titrations work: How to Titrate

This is what it looked like when the NaOH reacted and started to form a pink color.

This is what the solution in the flask looked like after we were done titrating and it was staying light pink.

This is what the whole funnel/buret set-up looked like.

Sunday, January 31, 2016

Acids and Bases

Properties of Acids: tastes sour, feels sticky, turns Litmus paper red, corrosive, less than 7 pH

Properties of Bases: tastes bitter, feels slippery, turns Litmus paper blue, caustic, greater than 7 pH

Arrhenius acids: produce hydrogen ions in solution (H+)

Arrhenius bases: produce hydroxide ions in solution (OH-)


Water can be an acid or a base (amphoteric).

Bronsted-Lowery acids donate a proton.

Bronsted-Lowery bases accept a proton.

Acids produce conjugate bases and bases produce conjugate acids. 

Vitamin C Lab

In chemistry class, we recently completed a lab where we tested different fruity liquids for their concentration of Vitamin C. We predicted that the liquids would rank as following (1= highest concentration):

1. V8 Juice
2. Unsweet White Grapefruit Juice
3. Apple Juice
4. Pear Nectar

To carry out this experiment, we took 20 drops of each solution, put them into test tubes, combined them with 3 drops of starch, then added drops of iodine until the solution turned and stayed dark blue. Here are all of the pipettes of our test solutions:


Here is what one of the solutions looked like after it turned dark blue due to all of the Vitamin C being used up.

After we completed the lab, we concluded that our concentration predictions were pretty close to the actual results. Here is the actual order of Vitamin C concentration:

1. Unsweet White Grapefruit Juice
2. Apple Juice
3. V8 Juice
4. Pear Nectar

Here are a few links that deal with what we did during this lab:


Sunday, January 17, 2016

Murder Investigation Lab

On Wednesday in class, we did a lab about finding the molarity of aqueous solutions. We were given some details about a theoretical murder case, and the list of possible suspects, and we had to determine who the murderer was. In order to do this, first we combined 20mL of the unknown substance with 40mL of NaCl and the reaction produced a solid. Here is a website about precipitation reactions like this, just for some review: Precipitation Reactions. Next, we filtered the solution to get the solid out. Once we had it completely filtered and it had dried, we weighed the filter paper to find the mass of the solid. From there, we had everything we needed to find molarity and determine the murderer. Overall, this lab was really helpful because it allowed us to practice finding molarity with an actual real life problem, instead of just practice ones. I now have a much better understanding and capability of how to do this. Here is a link to the only information we were given for this lab: Murder Lab

The solution while it was being filtered through the paper and funnel.

The filter paper with the solid in it, after it had dried.


Friday, January 15, 2016

Molarity

This past week in class, we have been focusing on morality. The equation to find a substances molarity, divide the moles of the solute by the liters of the solution. Although, volume is temperature dependent, so molarity can change with temperature. Here is a website I found explaining the basics of calculating molarity: Finding molarity

We also learned about the concentration of ions in a solution and the Van't Hoff factor. This is the number of ions that a compound will contribute to a solution (i). The Van't Hoff factor for covalent compounds is always 1. Here is another website I found, this one explaining the factor: Van't Hoff factor.

Lastly, we learned about dilutions. To find molarity of volume in a dilution, use the formula M1V1= M2V2. In a dilution, the high concentration substance is the stock and the low concentration substance is the making. An aliquot is a small amount of a starting solution. Here is another website, this one explaining dilutions and their equation: Dilutions

Saturday, January 9, 2016

Solution Composition

Solutions are made up of two distinct parts: the solute and the solvent. The solvent is whatever part is present in the largest quantity. The solute is whatever is dissolved into the solvent. Here are some examples of how to identify which is which in a solution:

-Chlorine tablets in a swimming pool: 
Solute: tablets
Solvent: H20

-Sugar and kool-aid mix in water:
Solute: sugar and kool-aid
Solvent: H20

-Cigarette smoke in air:
Solute: smoke particles
Solvent: air

-Sodium chloride in water:
Solute: NaCl
Solvent: H20

There is a limit to how much solute can be dissolved into any solvent. The solution can either be unsaturated, saturated, or supersaturated. Most solvents hold more solute at higher temperatures. 

"Good to the Last Drop" Lab

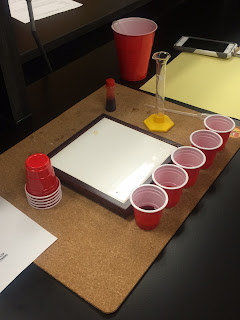
Yesterday in class, we completed a lab having to do with finding the concentration of different dilutions using molarity and volume.


We started out with 10mL of water in a cup and then added red food dye to it. Then we took 1mL of that solution and put it in a new cup, filled with 9mL of un-colored water. We then repeated this 3 more times. Here is what the set-up of the lab looked like:


Each time we moved 1mL of the old dilution to a new cup with water, the dilution became clearer and clearer, creating a cool ombre effect. Here is what all the cups of water looked like after we were done:


Here is a helpful website that I found to help with calculating concentrations and also explaining what dilutions are: Dilutions